from datasets import load_dataset import re ds = load_dataset("MrDragonFox/Elise", split="train") emotion_tag_pattern = re.compile(r"<[a-z]+>", re.IGNORECASE) texts = ds["text"] emotion_tags = dict() for text in texts: m = re.search(emotion_tag_pattern, text) if m: tag = m.group(0) tag = tag.upper() if tag notin emotion_tags: emotion_tags[tag] = 0 print(f"Found emotion tag: {tag}, text: {text}") emotion_tags[tag] += 1 print("Emotion tags:") for tag, count in emotion_tags.items(): print(f"{tag}: {count}")
输出:
Found emotion tag: <LAUGHS>, text: That's so sweet. And I hadn't even promoted it, I just like put in the descriptions of stuff and whatnot, and it just <laughs>. I was so surprised.
Found emotion tag: <GIGGLES>, text: Oh, God. <giggles> I'm just so happy. Oh, and it's all your fault. <giggles>
Found emotion tag: <SIGHS>, text: Deal with it. I will. I'll just scowl and watch TV by myself <sighs>.
Found emotion tag: <SNIFFS>, text: Wait a minute. No, that-that man over there, he's dressed different. <sniffs> Oh, he smells different.
Found emotion tag: <CHUCKLES>, text: I knew you two would get close quickly. Score another one for me! <chuckles> Sheesh!
Found emotion tag: <CHUCKLE>, text: <Chuckle> Hmm. Huh? Oh, no, no, I was just...
...
Emotion tags:
<LAUGHS>: 157
<GIGGLES>: 33
<SIGHS>: 72
<SNIFFS>: 3
<CHUCKLES>: 10
<CHUCKLE>: 1
...
for tag in additional_special_tokens: token_id = new_bpe_model.piece_to_id(tag) if token_id == new_bpe_model.unk_id(): print(f"Tag '{tag}' not found in the new BPE model!") else: print(f"Tag '{tag}' ID: {token_id}")
输出:
Tag '<LAUGHS>' ID: 12000
Tag '<GIGGLES>' ID: 12001
Tag '<SIGHS>' ID: 12002
Tag '<CHUCKLES>' ID: 12003
ids: IterableDataset = ds.to_iterable_dataset() supported_tags_pattern = re.compile("|".join([re.escape(tag) for tag in additional_special_tokens]), re.IGNORECASE) tags_count = {tag: 0for tag in additional_special_tokens}
deffilter_tags(sample, tags_count=tags_count): text = sample["text"].upper() if m := re.search(supported_tags_pattern, text): tag = m.group(0) tag = tag.upper() tags_count[tag] += 1 # Limit the number of samples per tag return tags_count[tag] <= 1 returnFalse
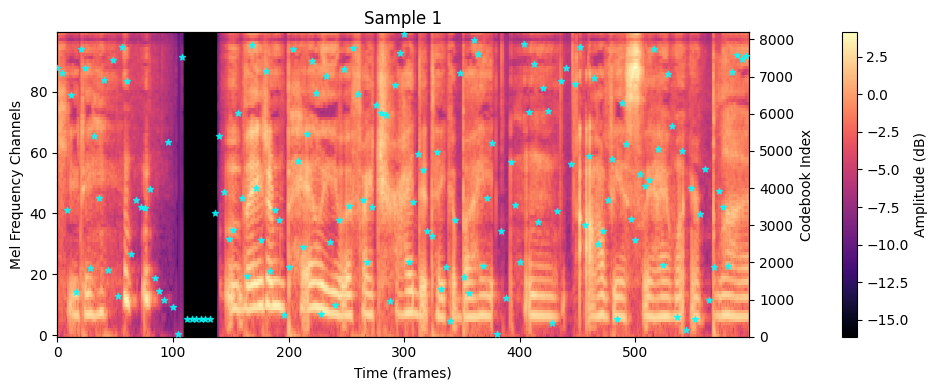
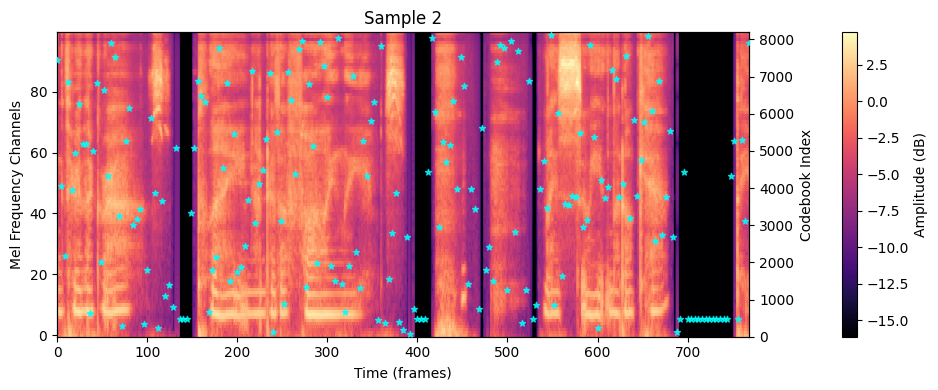
# Mel spectrogram on left y-axis im = ax1.imshow( mel, aspect="auto", origin="lower", interpolation="none", cmap="magma", ) ax1.set_xlabel("Time (frames)") ax1.set_ylabel("Mel Frequency Channels") ax1.set_title(title) # show colorbar below the image cbar = plt.colorbar(im, ax=ax1, pad=0.1) cbar.set_label("Amplitude (dB)") # Code indices on right y-axis if codes_indices isnotNone: downsample_factor = 4# 每4帧对应一个mel code code_time_axis = np.arange(0, len(codes_indices) * downsample_factor, downsample_factor) ax2 = ax1.twinx() scatter = ax2.scatter(code_time_axis, codes_indices, c="cyan", marker="*", zorder=10, alpha=0.8, s=20) ax2.set_ylim(0, num_codes-1) ax2.set_ylabel("Codebook Index") plt.tight_layout() plt.show()
输出:
Text: Cutie. <giggles> They’d impale you if I tried to take a bite, and obviously I want your blood. Text IDs shape: (30,) Mel shape: (100, 539) Codes: (135,)
Text: Running through the grass, playing under the falling leaves. <laughs> My sweet little kit, the- Text IDs shape: (28,) Mel shape: (100, 769) Codes: (193,)
# Resize the text head to match the new number of text tokens old_text_head_weight = state_dict["text_head.weight"] new_text_head_weight = init_resized_embeddings_weights_with_mean( old_text_head_weight, old_number_text_tokens, added_num_tokens ) old_text_head_bias = state_dict.get("text_head.bias", None) new_state_dict = state_dict.copy() # shallow copy new_state_dict["text_embedding.weight"] = new_text_embedding_weight new_state_dict["text_head.weight"] = new_text_head_weight if old_text_head_bias isnotNone: new_state_dict["text_head.bias"] = init_added_text_head_bias_with_mean( old_text_head_bias, old_number_text_tokens, added_num_tokens ) return new_state_dict
from sklearn.manifold import TSNE import matplotlib.pyplot as plt import numpy as np
defvisualize_embeddings( text_embedding, new_token_ids, token_labels=None, sample_ids=None, title="Text embbdings", show=True ): """Visualize the text embeddings using t-SNE.""" embeddings = text_embedding.weight.detach().cpu().numpy() # Select the embeddings for the new tokens and some random samples sample_indices = new_token_ids.cpu().numpy() if sample_ids isnotNone: sample_indices = np.concatenate((sample_indices, sample_ids))
import torch import torch.nn.functional as F classNewTokensTrainableAdapter(torch.nn.Module): """Wrapper for the new tokens training""" merged: bool = False base_layer: torch.nn.Embedding | torch.nn.Linear new_token_ids: torch.LongTensor def__init__(self, base_layer: torch.nn.Embedding | torch.nn.Linear, new_token_ids: torch.Tensor): super().__init__() self.base_layer = base_layer self.new_token_ids = new_token_ids.long() self.register_parameter( "new_tokens_weight", torch.nn.Parameter(base_layer.weight.data[new_token_ids].clone().detach(), requires_grad=True), ) # linear layer bias if isinstance(base_layer, torch.nn.Linear): if base_layer.bias isnotNone: self.register_parameter( "new_tokens_bias", torch.nn.Parameter(base_layer.bias.data[new_token_ids].clone().detach(), requires_grad=True), ) else: self.register_parameter("new_tokens_bias", None) self.base_layer.requires_grad_(False) # freeze the base layer
defrequires_grad_(self, requires_grad: bool): """Set the requires_grad attribute for the new tokens weights and bias.""" self.new_tokens_weight.requires_grad_(requires_grad) if isinstance(self.base_layer, torch.nn.Linear) and self.new_tokens_bias isnotNone: self.new_tokens_bias.requires_grad_(requires_grad) return self
def__getattr__(self, name): if name == "weight": if self.merged: # if merged, return the merged weight return self.base_layer.weight return self.get_merged_weight() return super().__getattr__(name)
defget_merged_weight(self): W = self.base_layer.weight index = self.new_token_ids.to(W.device) deltas = self.new_tokens_weight.to(W) return W.index_copy(dim=0, index=index, source=deltas)
defforward(self, x): """Forward method to replace the base layer with new tokens.""" if self.merged: return self.base_layer(x) W = self.get_merged_weight() if isinstance(self.base_layer, torch.nn.Linear): b = self.base_layer.bias if b isnotNone: bias_deltas = self.new_tokens_bias.to(b) b = b.index_copy(dim=0, index=self.new_token_ids, source=bias_deltas) else: b = None return F.linear(x, weight=W, bias=b)
defmerge(self): """Merge the new tokens weights into the base layer.""" ifnot self.merged: self.merged = True self.base_layer.weight.copy_(self.get_merged_weight()) if isinstance(self.base_layer, torch.nn.Linear) and self.new_tokens_bias isnotNone: b = self.base_layer.bias if b isnotNone: b.index_copy_(dim=0, index=self.new_token_ids.to(b.device), source=self.new_tokens_bias.to(b))
defunmerge(self): if self.merged: self.merged = False
使用 NewTokensTrainableAdapter 替换掉UnifiedVoice 的文本 Embedding 和 Head 层,并冻结其它所有参数权重:
1 2 3 4
model.requires_grad_(False) # freeze the model parameters
from torch.optim import AdamW EPOCHS = 2 BATCH_SIZE = 1# always 1 here GRAD_ACCUMULATION_STEPS = 2# accumulate gradients for 2 steps WEIGHT_DECAY = 0.1# weight decay for the new tokens training MAX_GRAD_NORM = 3.0# max gradient norm for clipping LEARNING_RATE = 1e-4# learning rate for the new tokens training
defcreate_augment_mel_datasets( dataset, max_new_pairs=2, emotion_tag_ids=[], augment_emotion_tag_ids=None, seed=333, ): from collections import defaultdict import random random.seed(seed) emotion_samples = defaultdict(list) # 1. 按情绪标签分组 deffind_emotion_tag(text_ids): for tag_id in emotion_tag_ids: if tag_id in text_ids: return tag_id return-1 for idx in range(len(dataset)): sample = dataset[idx] # text_ids 为经新的BPE模型编码后的文本 ID 序列 text_ids = sample["text_ids"] emotion_tag_id = find_emotion_tag(text_ids) emotion_samples[emotion_tag_id].append(idx) non_emotion_samples = emotion_samples.pop(-1, []) ifnot augment_emotion_tag_ids: augment_emotion_samples = list(emotion_samples.values()) else: augment_emotion_samples = [ emotion_samples[tag_id] for tag_id in augment_emotion_tag_ids if tag_id in emotion_samples and len(emotion_samples[tag_id]) > 0 ] augment_emotion_pairs = [] # 2. 针对目标情绪标签,交叉配对生成新样本 for sample_indices in augment_emotion_samples: if len(sample_indices) == 1: augment_emotion_pairs.append((sample_indices[0], None)) continue for idx in sample_indices: other_indices = [i for i in sample_indices if i != idx] augment_ids = random.sample(other_indices, min(max_new_pairs, len(other_indices))) for other_idx in augment_ids: augment_emotion_pairs.append((idx, other_idx)) # 3. 处理无情绪标签的样本 for idx in non_emotion_samples: for sample_indices in augment_emotion_samples: if len(sample_indices) == 0: continue augment_ids = random.sample(sample_indices, min(max_new_pairs, len(sample_indices))) for other_idx in augment_ids: augment_emotion_pairs.append((idx, other_idx)) # 4. 构建增强数据集对象 return AugmentMelDataset(dataset, augment_emotion_pairs)
test_pairs = [] validation_pairs = [] ... for idx in non_emotion_samples: sample = dataset[idx] if sample["mel"].shape[1] < 250: continue for sample_indices in augment_emotion_samples: if len(sample_indices) == 1: augment_emotion_pairs.append((idx, sample_indices[0])) continue augment_ids = random.sample(other_indices, min(max_new_pairs, len(sample_indices))) if len(augment_ids) == len(other_indices): validation_ids = [] else: validation_ids = [i for i in other_indices if i notin augment_ids] validation_ids = random.sample(validation_ids, min(max_new_pairs, len(validation_ids))) for other_idx in augment_ids: augment_emotion_pairs.append((idx, other_idx)) for other_idx in validation_ids: validation_pairs.append((idx, other_idx)) if len(other_indices) - len(augment_ids) - len(validation_ids) > 0: remaining_indices = [i for i in other_indices if i notin augment_ids and i notin validation_ids] remaining_indices = random.sample(remaining_indices, min(max_new_pairs, len(remaining_indices))) for other_idx in remaining_indices: test_pairs.append((idx, other_idx))
1 2 3 4 5 6 7 8 9 10 11 12 13 14 15
emotion_tag_ids = list(config.dataset.additional_special_tokens.values())
# select one or more emotion tags to augment mel dataset
augment_emotion_tag_ids = [
    config.dataset.additional_special_tokens["<GIGGLES>"],
]
train_augment_ds, valid_ds, test_ds = create_augment_mel_datasets(
    processed_ds,
    max_new_pairs=2,
    emotion_tag_ids=emotion_tag_ids,
    augment_emotion_tag_ids=augment_emotion_tag_ids,
    seed=233,
)
print(f"Augmented mel dataset size: {len(train_augment_ds)}, for target emotion tags: {augment_emotion_tag_ids}")
print(f"Validation dataset size: {len(valid_ds)}")
print(f"Test dataset size: {len(test_ds)}")
输出为:
Augmented mel dataset size: 1762, for target emotion tags: [12001]
Validation dataset size: 293
Test dataset size: 10
LEARNING_RATE = 2e-5
WEIGHT_DECAY = 0.01
# Efficient Low Rank Adaptation of Large Models: https://arxiv.org/abs/2402.12354
optimizer = create_loraplus_optimizer(
    model=model,
    optimizer_cls=AdamW,
    lr=LEARNING_RATE,
    loraplus_lr_ratio=8,  # lr ratio for lora_B weights
    loraplus_weight_decay=WEIGHT_DECAY,
    # loraplus_lr_embedding=2e-5, # not used, since we are training text embedding with NewTokensTrainableAdapter
)
defsave_checkpoint(model: UnifiedVoice, checkpoint_path, merge_lora=True, unload_after_merge=False): """Save the model checkpoint.""" from collections import OrderedDict
checkpoint_state_dict = OrderedDict() model.eval() if merge_lora: model = merge_lora_weights(model, unload=unload_after_merge) state_dict = model.state_dict() for key, value in state_dict.items(): ifnot key.startswith(("gpt.wte", "inference_model.")) and"new_tokens"notin key: checkpoint_state_dict[key] = value torch.save(checkpoint_state_dict, checkpoint_path) model.train() if merge_lora andnot unload_after_merge: unmerge_lora_weights(model) del checkpoint_state_dict, state_dict print(f"UnifiedVoice checkpoint saved to: {checkpoint_path}") return checkpoint_path
welcome_texts = [ r"Hey there my name is {name}, <giggles> and I'm a speech generation model that can sound like a person.", r"大家好,我是 {name},一个语音生成模型,<giggles> 我的声音听起来跟真人一样。", ] en_texts = [ "Seriously? <giggles> That's the cutest thing I've ever heard!", "Oh, my gosh! <giggles> She called my name many times! <giggles> I— I’m so excited!", "Wha-? Cute? <giggles> You think I'm cute? Well, uh, thanks, I guess?", ] zh_texts = [ "真的吗? <giggles> 这也太可爱了吧!", "我的天啊!<giggles> 她叫了好几次我的名字。<giggles> 我…我好兴奋啊!", "你说什么?可爱?<giggles> 你觉得我可爱?<giggles> 嗯…呃… 谢谢。", ]
1.Danny Hernandez, Tom Brown, Tom Conerly, Nova DasSarma, Dawn Drain, et al. Scaling laws and interpretability of learning from repeated data. arXiv:2205.10487, 2022 ↩
2.Ross Taylor, Marcin Kardas, Guillem Cucurull, Thomas Scialom, et al. Galactica: A Large Language Model for Science. arXiv:2211.09085, 2022 ↩
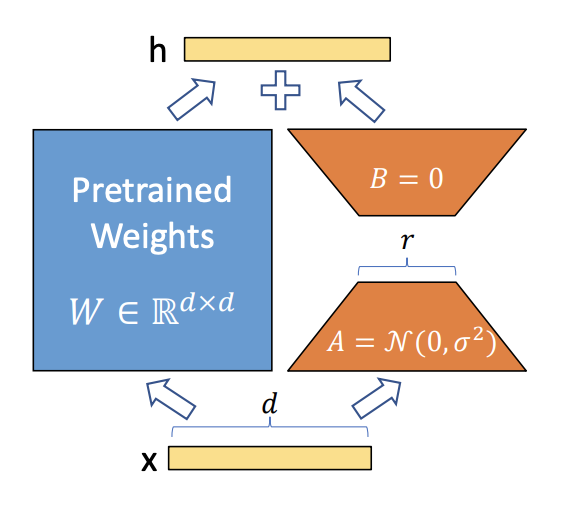
3.Edward J. Hu, Yelong Shen, Phillip Wallis, Zeyuan AllenZhu, Yuanzhi Li, Shean Wang, Lu Wang, and Weizhu Chen. Lora: Low-rank adaptation of large language models. arXiv:2106.09685, 2021 ↩
4.Yang S, Ali Z, Wong B. FLUID-GPT (Fast Learning to Understand and Investigate Dynamics with a Generative Pre-Trained Transformer): Efficient Predictions of Particle Trajectories and Erosion. ChemRxiv. 2023; doi:10.26434/chemrxiv-2023-ppk9s↩
5.Soufiane Hayou, Nikhil Ghosh, Bin Yu. LoRA+: Efficient Low Rank Adaptation of Large Models. arXiv:2402.12354, 2024 ↩